Easy NO-SEW Cricut Pencil Pouch Pattern


Do you want to make this easy no-sew pencil pouch? Available in my Etsy Store. This project comes with a SVG for your personal cutting machine and a printable version PDF to hand cut. I am so happy to share this with you.

I made this pouch out of faux leather that I got at Joann's. It is actually a vinyl material. It is thin enough for the Cricut to cut it. Please follow Cricut cutting recommendations.  


I cut 2 panels to give the pouch a little girth. You don not have to. But it looks professional when the bag is lined. I used Heat & Bond to adhere them together. That is another super product. I cut that in my Cricut as well. You just heat and it bonds. They have great directions, just follow the package. 


Use parchment when ironing the faux leather. It is a synthetic material and it will melt!!!


I used a strong glue to assemble the pouch together. I used E-6000. This stuff glues anything together. 


When the bag is laying flat as shown, add glue on the top flap. 


Fold that top flap over the middle flap and hold until it is secure. I like to use mini clips. Repeat this for the opposite side.


You will glue the other flaps in that same fashion. Hold until secure. 


After I assembled the bag, I added a clip with the provided straps.


Just fold strap in half and adhere to the bag.


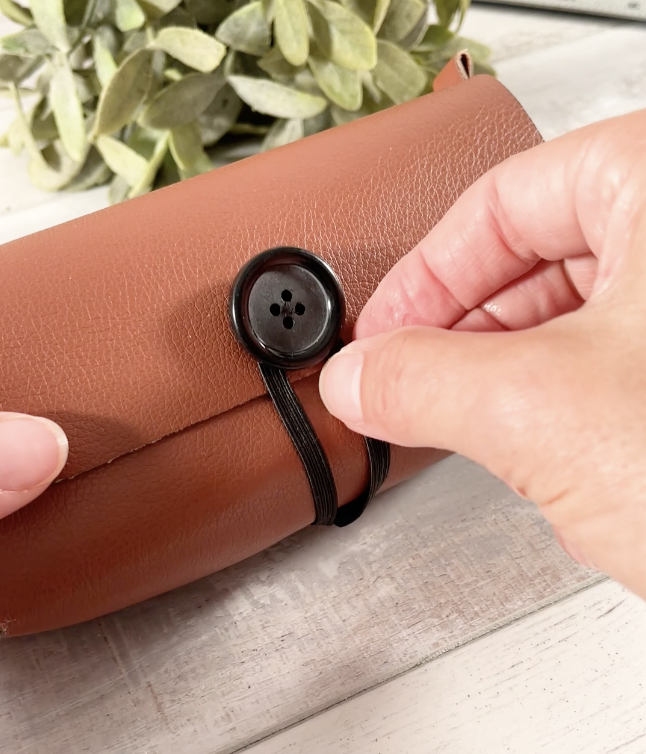
Now add a  button and some elastic. You can just do velcro if you like.


Poke a small hold and loop a piece of elastic, knot the ends and pull it through the hole. This will keep the elastic from pulling through the faux leather. You can secure it with a little glue in the inside to reinforce it.


It is perfect for pencils and pens. I created a mini version to hang off my key chain. It works to keep my lip moisturizer and Airpods handy.


I hope you free inspired to make one for yourself!

Birthday Party Project Cupcake Gift Bag


@Cricut has teamed up with @thebirthdaypartyproject and challenged crafters to make 50,000
projects to help celebrate kids in need.⁠

I am very inspired by @pigskinsandpigtails and all her creative projects. I too fell in love with Cricut
vinyl screen printing. I created this birthday gift bag. I thought it was a special way for a child to
receive a gift. The little pocket is perfect for money, gift cards or just a place to hold little treasures.

I created the SVG that is available in my Etsy store. Link above. I thought vinyl screen printing was an
easy way to make multiple bags very quickly. I will be sending my bags off in the mail tomorrow.


Here is how I did it.


Download the SVG from my store. Using your Cricut and a fine-point blade, cut a piece of Permanent Premium Vinyl. It is very important to MIRROR image when cutting vinyl for silk screening!


Weed your image. Remember you need to remove the vinyl where you would like color to be. I wanted the words to be in yellow ink, so I removed them.


Apply transfer tape and adhere it to the back of your screen. Flip your screen over and rub it down.


Carefully remove the transfer tape. The words should read backwards.


With the words reading backwards, tape the entire screen around the vinyl. The ink will go through anywhere the screen that is not covered. So, tape everything you do not want ink to go through.

Position your felt under the screen. Make sure it is lines up correctly. Tape down so it does not move.


Apply ink to your screen. I love Speedball fabric ink for this project. It is permanent and soft when dried.


Use a squeegee and pull the ink through the screen. You may need to do it a couple of times the first time to get a nice print.


Let dry. Heat set with an iron or Cricut Heat Press. Use a press cloth or parchament to protect the felt from scorching. It is synthetic, it will melt.

That is how screen printing with vinyl is done. It takes some practice but the benefits of screen printing is that you can make multiple prints very quickly. You only need to cut and weed one piece of vinyl. It is also cheaper than HTV vinyl. ]


I also screen printed the sprinkles. Once everything is dry, I assembled the cup cake. I used a 7 inch zipper. 

Add a line of fabric glue to the zipper as wide as the cup cake bottom. Do not glue onto the zipper's teeth. Press firmly so the glue soaks into the felt.


Now add a line of glue as wide as the cup cake top to the zipper. Do not glue the felt onto the zipper's teeth. Press firmly so the glue soaks into the felt.

Grab your tote and put a piece of paper or newspaper inside the tote to protect it from glue that may soak through.


Flip cupcake over to the back and begin adding a line of glue around the entire edge of the cupcake. Do not glue over the zipper's teeth. Add a few dots of glue at the end of the zipper.

Flip the cup cake over and stick it to the tote. Press firmly until the glue siaks into the felt and canvas. Let for at least an hour before using. It is washable after 24 hours.

⁠Want to get involved? Just make a project (or multiple). Then, mail your completed projects to: ⁠

The Birthday Party Project⁠

ATTN: Cricut Projects⁠

2143 Farrington Street⁠

Dallas, TX 75207⁠


Bunny Free Download

Want to make this adorable Easter project? Free to all my followers! Just click below to download the free SVG and directions. The directions will walk you through the assembly of the bunny. Simply add your own flowers or Easter decorations. I am so happy to share this with you. Please like, follow and comment wherever you saw my video.


TERMS OF USE

Please do not distribute, share, resell, or otherwise make my designs available to others in any digital format or replicable stencil, at any time.


You are welcome to use my files for any and all personal finished paper, vinyl, embroidery, or printed, or wood type projects.


Enjoy!

Stacy


 With the climate of the world right now, this project just seems fitting! 

I pray for those who have been affected! I pray for peace! Visit my Instagram @stacymarksdesigns to watch the short tutorial.


Do You Wanna Get Lucky?

Do you wanna get lucky? Make this easy craft with a couple of supplies and you too will get lucky!!!! Visit my Instagram @stacymarksdesigns to watch the short tutorial.


Moravian Star SVG

I got a chance to craft and I made a Moravian Star to hang in my home. Updated my Etsy store with new easy to follow directions. Visit my Instagram @stacymarksdesigns to view the short video tutorial.


Visit my Etsy store for more details.


Search This Blog

Powered by Blogger.