Grab Your Free Black Lives Matter Graphic

I wanted something to show my support. I created this graphic so I can post it on my blog. Then I made a t-shirt with it. I created it for myself and thought that others may like this as well. I am offering this for free.  Please use this for yourself, your kids, your neighbors, your friends.  Save this and print it out on your printer and hang in your window. Make a poster. If you have a Cricut like me, below I made directions so you can use the print-then-cut feature to make stickers, a banner and use HTV for a t-shirt graphic. 

It's a simple thing that I can in some way make a statement. Help me! Tag a friend, like my post, share my post and make something important!


Directions to print this file: Personal use only
1. Right click on the Black Live Matter graphic.
2. Click Save Image As. Pick a location on your computer
3. Double click on the file > Print

Directions to Print then Cut on the Cricut: Personal use only
1. Right click on the Black Live Matter graphic.
2. Click Save Image As. Pick a location on your computer.
3. Open Cricut > Choose file > Open
4. Click Simple > Continue
5. Make sure Print then Cut is selected > Save
6. Now choose the uploaded Image
7. Size 9.5 W (That is the size limited to this feature)
8. Load card stock or sticker paper in your printer
9. After it prints, put it onto your mat and load into your Cricut (see video)


Directions to Cut on the Cricut: Personal use only
1. Right click on the Black Live Matter graphic.
2. Click Save Image As. Pick a location on your computer.
3. Open Cricut > Choose file > Open
4. Click Simple > Continue
5. Click all white portions of the graphic > Continue
6. Click on Save as Cut > Save
7. Now choose the uploaded image
8. Change the size to fit the size of your project
9. Put HTV/vinyl onto your mat and load into your Cricut

Stay Safe!
Stacy


0

Sweet Tote


Now that most states are back open for business, let the summertime fun begin! I created this super  sweet mini tote perfect for summertime essentials for little campers. This project tote is so simple to create for or with your child. Learn how to create this zipper pocket to hold things like ear pods, money or chap stick. Every adventure needs a bag to match.  Check out the video on how easy this is to create!


0

DIY Stenciled Patio


I have been rolling through some home projects.  These are the bright ideas I had when I had no time to do them.  In these last few months, I have been fortunate to plan, create and make my ideas come to life. Watch my quick video.


Our back patio was sooooo boring.  It is old and stained but structurally in good condition.  It was just not pretty to look at. I have been researching different techniques on how to spruce it up. I thought my best option was to stencil a faux area rug.  I am into farmhouse decor and settled on something white with a simple pattern. I figured it would mask the bland concrete.  I did like the natural concrete color and some areas that blue grey flecks poked through the warn areas was interesting to me.


I was not happy with any stencil I found in the stores.  I figured this is a job for my Adobe Illustrator skills and something for my trusty Cricut. Creating a stencil was not as easy as I first thought. You need to be precise on all 4 sides.  I mean exactly the same, people! I drew out a design, created a vector in Illustrator and cut it out a million times on card stock before it was perfect. I had some Folk Art Stencil Plastic that I loaded into my Cricut. I cut it with a Deep Cutting Blade 11.5" x 11.5" and I was ready to go.


I gave my patio a good power washing and gathered my supplies while I was waiting for the patio to completely dry. It was a super hot day so it only took an hour or so. I had my husband helped lay out exactly the center and we snapped a few chalk lines.  This is the key to making sure it all matches up. I got lazy on a row and a few squares did not line up perfectly.  This could have derailed me but I kept pushing on. I kept telling myself, it does not have to look perfect, it's hand made! The stenciling process is not hard but hard on your butt and knees and back and neck.  It took many, many hours sitting in a crunched position. I did row after row after row until I completed it.


What I learned along the way...
1. Wash your stencil brush periodically.  The paint dries and it will ruin your brush. 
2. Have more than one stencil. After a row, soak your stencil in hot water to soften the paint and keep stenciling with the duplicate stencil.  If there was not a pandemic and Micheal's was open, I would have cut lots more stencils and not even taken the time to clean them.  It is very time consuming!
3. Have a pillow or old towel on hand to sit or kneel on. It will save some aches and pains.
4. Measure and chalk straight lines. Don't try to eye ball it because an 1/8" of an inch multiplies over the length of the patio.
5. Have a small dust broom on hand for the occasional leaf or ant that walks by.


After days and many hours of hard work, I am gonna seal the paint with a concrete sealer.  I did not do this yet because the weather is not cooperating. It is not necessary, but it was a lot of time and I want it to last.

Thanks for keeping up with all my projects!

Stay Safe,
Stacy


0

Cheap and Easy Outdoor Sign


Materials to create this project:
- 8 Dog Ear PT Pickets from Lowe’s  ($13.44 total)
- Wood glue (I use Gorilla Wood Glue)
- 3/4” nails. I used a nail gun but regular nails & hammer would work.
- Vinyl cut letters for the mask. I cut my letters from my SVG available in my Etsy Store (.99 cents)
- Spray paint (I used Rust-Oleum Flat Black) ($4.38 each)


To start you need 8 Dog Ear PT Pickets from Lowes. ($13.44 total). You can have your wood cut at Lowe’s in the lumber dept. if you do not have a saw. 

Cut a clean end off of one end.  Measure 70” and cut the other end. 


Repeat for 6 pieces.

Lay out all 6 pieces on a flat, level surface. I make sure all the slats touch (with no space between them) because they will shrink.


Measure the height of your sign.  Due to shrinkage, you want to make sure you cut your back braces to that height.  If you had your pieces cut at Lowe’s, just adjust your 6 slat pieces accordingly. It is fine to have space between them because eventually the wood shrinks and spaces will happen. 

With your 6 slat pieces laying flat, glue and nail on back braces evenly spaced. You do not need to
measure this out. Just eyeball it.

You are ready to flip over and paint.

I used the SVG that I created for this project. I used my Cricut and individually cut all the letters onto vinyl. Open the large format SVG and set the size to 26.5 high. This is extremely large and your Cricut will not be able to cut that at once. However, you will be cutting these letters individually onto vinyl. *Do forget to change the date!  I used 2016 because that is the date we moved into our home. 


Position what you can to fit onto your vinyl and hide the rest by clicking on the eye icon in the layers panel. You are making no more than a sticker. You will then peal and stick them onto your sign to mask areas from the paint.  I used 8 12”x12” pieces of vinyl. 

The vinyl creates a mask to block out the paint. I wanted my sign to be all black.

Once all cut, position the letters on to your sign. It may take you a few tries to get your letters straight and spaced like you want. Refer back to the original, that will help.  

Once you are happy, rub them down. The wood is textured so it will take a little pressure.

Prop your sign outside in the grass. Keep it away from anything you do not want painted.  The wind will carry the particles and could land on your house, your sidewalks, your car, etc.  You do not want that!!!

Spray in short strokes to cover the sign.  Spray right over the vinyl. I used 1 whole can of spray paint ($4.38 each).  I purchased 2 just in case. 


Let dry for an hour.  Pull off the vinyl.

You are finished.  Hang and display outdoors! I will post again when my hubby gets it hung for me.


Stay safe!
Stacy

0

It's the Thought That Counts - Video Tutorial


May starts a very busy celebration season for us.  Birthdays, Mother's Day, anniversaries and graduations...one after another. I love giving gifts! Picking out the perfect thing for that special someone. Now-a-days, it is hard. Money and gift cards may be the gifts of choice. But to me, they do not feel very personal. I get it, people LOVE them! I am a firm believer that it's the thought that counts. I decided that I will make the outside of the gift count. I created my own wrapping paper with kraft paper, acrylic paint and a potato. I just wanted a small polka dot pattern and a little Russet works perfectly.  I sliced it in half and dipped it into the acrylic paint.  Let it dry.  Check out my tutorial showing how I used this technique on my homemade printed buffs.

Watch my video tutorial on how to dress up the package with a cupcake liner flower.  Super easy and beautiful. Maybe Mom would like one on her gift this Sunday!

https://youtu.be/NizPRCoS9ts

Happy Mother's Day! Be safe! 
0

Wish-List Crafty Ideas


I have been doing so many projects around my house.  My to-do-list was more like a wish-list until the pandemic. Now, I am creating more and loving the idea that whatever crafty idea I have, I can do almost immediately. I was lucky enough to have an old Singer sewing machine base.  It was one of those wish-list things I never got around to making something with. I wanted to make it into a planter for my porch. I have a lot of scrap wood in my garage because I have sooooo many ideas! I drew out what was in my head for my hubby and he whipped together with rough crate. I stained it, drilled holes in it and used some chunky rope for handles. I loved it but it needed something more. I created a vintage stencil to make the crate look more authentic. A little acrylic paint and then I sanded to distressed it and threw some poly on it because I knew it may get a little wet as it is a planter.  I lined it by stapling a lawn and leaf trash bag inside, again for the moisture. So cute on my porch! 


If you would like to create this stencil, I have it discounted in my shop for .99 cents. You get two for the price of one. Got a flower pot or an empty box that needs pizazz?! Check it out here!


0

Free Downloadable/Print & Cut Vintage Labels


I have been using my time wisely. I cleaned out two closets and a storage room today. I really pared down the things we have. It is very therapeutic for me to open the door and see a space so organized. I felt the only thing better would have been if everything was labeled so I know what's inside my organized bins. I created a label so I can print them out as I needed. I went as far as labeling the spice jars in my pantry.  I make a yummy steak rub to marinade a London Broil on the grill. I usually make a double batch so I have some for later. These little jars are perfect, especially with labels on them.


In the spirit of organizing, I have a label sheet you can open and print. I used Avery Label 94200 but you could use plain printer paper, then cut and tape or glue your labels on. Or, if you are a Cricut fan, save the PNG and drop it into Design Space to use the cool print & cut feature.


Happy organizing! Stay safe!
Stacy

0

Creating Your Own Printed Buff


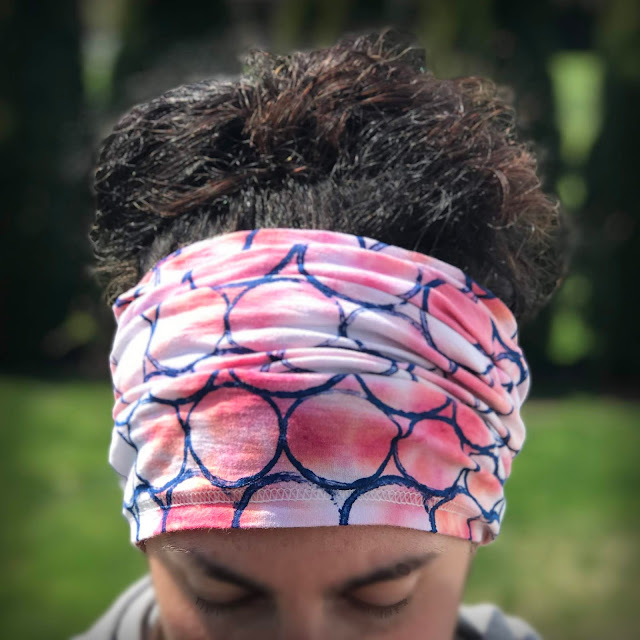
I have more projects than I have time to complete them all. I felt this was a necessary one for the future.  I have a feeling that face-masks might be the norm for a while.  I was inspired by my father who had one given to him last summer at an outdoor concert advertising Channel 6 News. I thought I could make them and it would be an ideal way to cover your face when you need to and pull it down on your neck or cover your head when you don't.  I can't go and get supplies, so I had to make do with what I found around the house. 

Supply list include:
Old t-shirt
Acrylic paint and a paper towel tube (optional for artsy-fartsy types)
Scissors
Ruler
Pins & threads
Sewing machine

First I cut an old t-shirt.  This one was a Gildan brand t-shirt that my son tie-dyed years ago.  It was at the bottom of my t-shirt pile, that's how I knew it was not worn in a long time.


I began by ironing the shirt so it was flat and straight.  I measured from the bottom hem up to the arm pits.  Mine was about 16". It could be bigger or smaller.  Cut a straight line.  With the cut piece in front of you, measure over from the left or right sides approx. 10". Draw a vertical line to the one you just cut. Cut and now you are ready to print.


I was not happy about the tie-dyed pattern, so I wanted to create my own.  I used a paper towel roll and some acrylic paint.  Yes, it works on fabric.  Once it drys, heat set with an iron so it remains permanent.


Open the fabric right side up so it's 16" x 20". I started printing at the hem because it is a straight reference point. Begin by dipping your tube into the paint and onto the t-shirt material. You could be random if you like.  I choose to connect my circles.


It is pretty simple.  They don't have to be perfect.  Let the paint dry and iron to heat set. Now you have a totally original print. 

Next you need to fold and pin right sides together so the wrong side are out. Pin the 16" edge. I used a zig-zag stitch along that edge.  I feel that stitch works best with stretchy fabrics.


At this point you could be done. It does not need to be hemmed because the fabric does not unravel.  Just give it a little tug along that 10" unfinished side and it will roll a little and look fine.

I wanted to hem mine.  I used a pink thread to pick up the tie-dyed color. I folded down the hem about a half an inch and used a zig-zag stitch along that edge.


My husband loved it!  Real men wear pink!  It would be great when he runs the weed eater for his face and keep the sun off his head when I am working him hard in the heat of the sun.  It's light, and washable.  I am gonna make a few more to get us through this pandemic and beyond. 


I am making one for myself so I can wear this to cover my head instead of a hat.  I will cut down he size to be 16" x 19" to fit a little tighter over my face.

If you like this project, visit my web-site for a tutorial on this and many other projects.

Stay safe,
Stacy
0

Free Easy Easter Project


Free Easy Easter Project you can make with your kids (or yourself) today from materials you may have around your house. Easter is this Sunday. I made this quick and easy project that you can hang to celebrate this special time of year. This is something simple. Only a few materials are needed. Click this link to download the free PDF template & print. Grab some glue or tape, pencil, paper...any paper, newspaper, scrapbook paper, construction paper, kraft paper bags; scissors, cotton balls (if you have them), and some string, yarn or ribbon. Watch the video to see how easy this really is. Happy crafting & Happy Easter!


0

Learning something new

We all are navigating these new times as best as we can...coping however we can. I decided that I will not waste this time feeling sorry about my job or the loss of time with friends and family. I decided to connect with others and keep myself busy through what I love to do.

I have lots of time to create and learn new skills. People ask, how do you do that? Well, I started to chronicle my craft-making process by learning iMovie. I will put together some mini-movies of things I am creating to hopefully inspire you to do the same.


0

I LOVE Crafting!


The Christmas trees are down. Lights are tucked away for another year. I feel like Christmas is the reason for the season of crafting. I wanted to keep the crafting spirit rolling. What can I make now and who can I make it for? Isn't that the reason we craft? Valentine's Day is one of those cute and kind-of-corny holidays when we can express ourselves through hearts and XOs. I wanted to create a note in which to write sentiments and, while I was at it, create a matching tote to fill with little sweet nothings.


I had some beautiful pink ink form Speedball. Using my Cricut, I cut vinyl and set up a screen so it could be printed. It is so nice to cut and weed just one piece of vinyl to reproduce multiple projects. I ended up creating 10 note cards and 4 tote bags. The Hello Love design is now available in my Etsy Store.


I also created a Hello Friend version for special notes for your BFFs.  Cut them, print them and give them away! 
0

Search This Blog

Powered by Blogger.